Rope & Tire Basket Lunch Bag
A while back, I decided to make a lunch bag to transport my daughter’s various boxes and bottles to daycare. The requirements were – something pretty, something big, something tall enough to carry her Dr. Browns feeding bottles. After looking around, I found this free design – the basket bag design by Pierrot. The design looked very pretty and do-able. The great challenge with this pattern – this design is a Japanese pattern. Meaning: there are no row by row instructions written in words – instead, there is a pictorial representation of what needs to be done.
However Pierrot have made it easy to understand how to decipher their design with very useful, minimal explanations on the side. I also found two other links which i have since bookmarked:
Craft Minx – https://www.craftyminx.com/2011/11/crochet-school-lesson-21-reading-crochet-charts.html
Dancing Barefoot – https://dancingbarefoot.wordpress.com/2010/01/24/japanese-pattern-reading-tutorial-lesson-1/
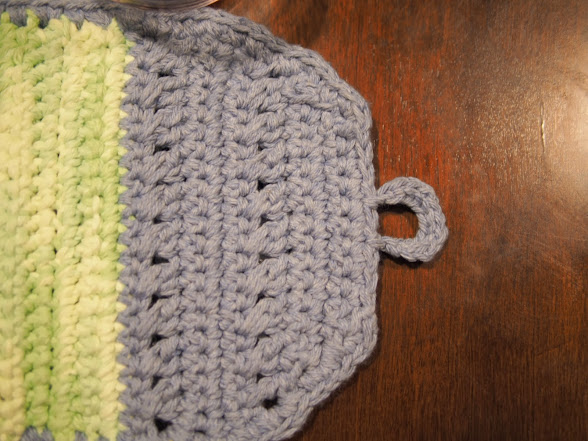
Here is what my bag looks like:

Basket bag – 1
Another View:

Basket Bag – 2
Here is the summary of my pattern:
Ravelry Link to my bag – https://www.ravelry.com/projects/ropeandtire/basket-bag
Pattern Link in ravelry – https://www.ravelry.com/patterns/library/basket-bag (by Pierrot (Gosyo Co., Ltd) – 213ss-39 Basket bag )
Direct Link to PDF – https://gosyo.co.jp/english/pattern/eHTML/ePDF/1304/213ss-39\_Basket\_Bag.pdf
Yarn Used –
- Lily Sugar n Cream Solids and Denim – Stonewash (2 skeins)
- Lily Sugar n Cream Scents – Aloe (2 skeins)
Crochet Hooks Used
- Turn of the Century – Purple Heart in 5mm (H)
- Lantern Moon – Ebony in 3.5mm
- Turn of the Century – Bloodwood in 3.75mm
Total Time to make bag – Large ~ 10.5hrs
Crochet body of bag – 2hrs 07 mins (over many days)
Crochet handles – 34mins
Crochet Lid – 1hr 50 mins
Lining for body and lid, attaching lining and button ~ 6 hrs
Pattern Modification Notes:
-
For the large lid, the loops to loop around the button: the design called for a ch 10. Instead I used Foundation Single Crochet of 10. Here is a great tutorial on Foundation Single Crochet by futuregirl
-
For the large lid, I used ‘Aloe’(green) for the center chain, the sc row attached to the center chain and rows 1,2 (on both sides). The rest were in ‘Stonewash’(Blue)
-
The body of the basket needed to be taller – So instead of 20 rounds, I did 25 rounds.
-
I used two colors for the body as well. The bottom of the bag, plus side rows 1-7 were in ‘Stonewash’ (blue). Rows 8 to 18 were in ‘Aloe’ (green). Rows 19 to 25 were in ‘Stonewash’ (Blue)
I wanted the basket bag to be tall enough to hold feeding bottles – however I did not make it tall enough. for this purposes, I wish I had crocheted 5 more rows – bringing the number of rows on the basket side to 30.

Basket Bag – 4
After the bag was done, I blocked the bag and made the handles. I used some rope as a strong insert for the bag handle interior.

Blocking the Basket Bag
The design and pattern however did not specify a lining. And I definitely wanted a waterproof lining. So I went to my local Ross and bought a Vinyl tablecloth, flannel backed for less than $5.00 – which will provide lining for many many lunch bags or other projects I can think of in teh future.

Lining Table Cloth